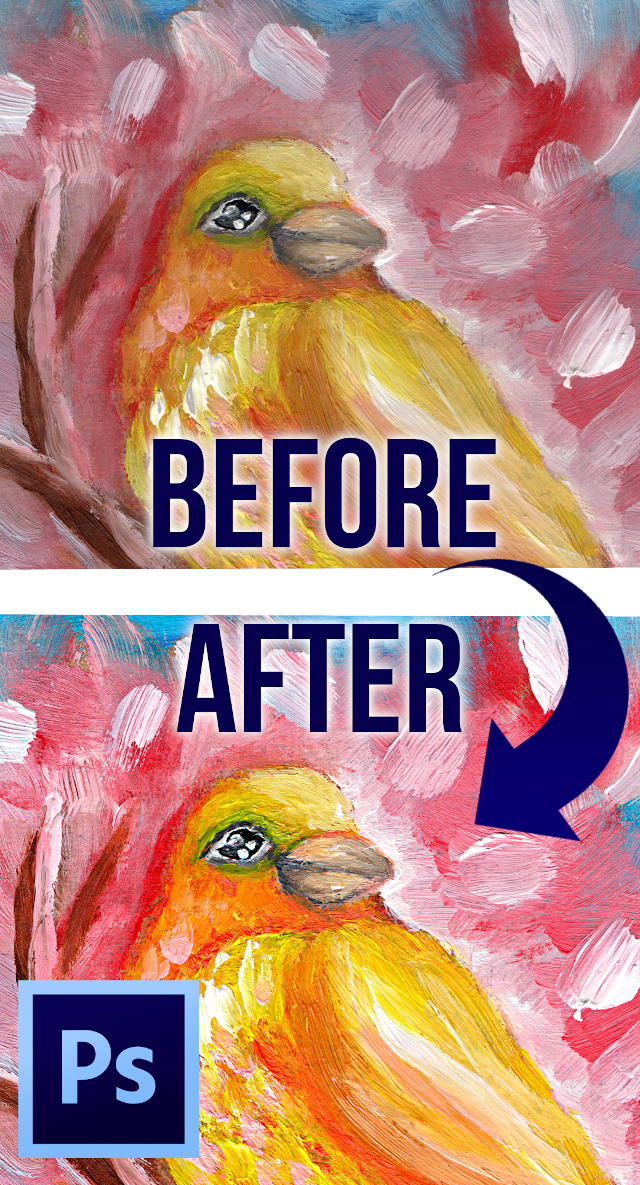
Want to fix up your traditional, scanned or photographed artworks for prints or your print-on-demand shop? I'll show you how to edit your artworks in Photoshop. We'll go though how to brighten up the colors, spruce up the contrast, make the art look sharper, crop and rotate, fix any small errors like dust particles from the scanner or paint brush bristles and see what's the deal with RGB and CMYK color modes! You can watch the Photoshop tutorial video or keep reading.
If you don't have Photoshop, you can start a free 7 day trial, which you can cancel at anytime before the 7 days are up. Adobe also has student discounts and different bundles and offers, which I'll link to below, if you want to buy a Photoshop subscription.
Disclaimer: Links marked with * are affiliate/referral links that let you support the blog / YouTube channel at no extra cost to you, if you make a purchase through them.
I started by scanning this oil painting or actually two oil paintings. You should scan in at least 300 dpi for prints. I usually do a bit higher than that, like 600 dpi.
If you're taking a photo, use natural light preferably and a large file size. Have the camera on a tripod or stand and use a timer for taking the photo, so pushing the button won't shake the camera as the photo is being taken.

When you've opened the scan or photo in Photoshop, you can click the magnifying glass icon to use the zoom tool to zoom in. Press alt when using the zoom tool to zoom out.
Let's start with levels to make the darks darker and the highlights lighter. You can adjust the levels at Image - Adjustments - Levels. Click the lightest area with the white eyedropper and the darkest area with the black eyedropper. You can toggle between the before and after by ticking the preview on and off. When you're happy with the result, click Ok.

Next let's do contrast at Image - Adjustments - Brightness and contrast. Use the sliders to adjust them and the preview to compare the before and after.

You'll also want to sharpen the image and you can do that at Filter - Sharpen - Unsharp mask. You can play with the amount, radius and threshold and see the result preview zoomed in in the little window. Try to make it as sharp as possible but without making it look grainy.

The scanner often makes the colors kind of dull, so you can fix that by adjusting the vibrancy and saturation at Image - Adjustments - Vibrance. You can play with the sliders to adjust both vibrance and saturation to make the image look as close to the original artwork as possible. Or if it's a grayscale image, you can get rid of blue, yellow or red tones etc. by turning it grayscale at Image - Mode - Grayscale.

If you've taken a photo under warm or yellow lighting especially, you'll want to adjust the temperature at Image - Adjustments - Photo filters. And in the case of warm lighting, you can choose the cooling filter to get rid of the overall yellow tone of the image. And vice versa, if the image looks too blue, you can use the warming filter. For this scan, though, I don't need a filter.

You can also further adjust the shadows and highlights if needed at Image - Adjustments - Shadows/highlights. Turning the shadows slider right will make the shadows lighter and left will make them darker. Whereas turning highlights slider right makes them darker and turning it left makes them lighter.

You can fix small mistakes and remove dust particles from the scanner or bristles fallen from the paint brush with the spot healing brush tool from the left toolbar. Adjust the size and the hardness from the top bar. I'll make it pretty small since the imperfections are also small and set the hardness to 0 so it doesn't leave any visible hard edges but blends into the painting. And then just find and click to the areas you want to fix. Photoshop will erase the mistakes and blend those parts in the surrounding areas.

The scan or photo might have white edges around it and the artwork might be tilted one way or the other and you can fix that with the crop tool from the left toolbar. Just drag the corners to the right size and you can rotate the image by pressing and dragging the image with the mouse. When you're done, hit enter or click the check mark in the top bar. You can always undo with Ctrl Z.

If you're making prints of your art, you might want to check what it looks like in CMYK color mode, which is used for printing. Your scan or photo will probably be in RGB color space, which has more shades and some of them are brighter or more saturated than in the CMYK color space. I'll talk about this more in an upcoming post, but for now, if you want to check what your art looks like in CMYK color mode, here's how to do it in Photoshop.
Go to Image - Mode - CMYK Color. For this image, the difference is not huge. Some colors are a little less saturated, but it doesn't bother me. The magnitude of the difference depends on the colors you've used. You will need to upload a RGB color mode image to many print on demand sites, though. I'll just go ahead and undo the color mode change and save the RGB version. But if yours looks too dull, you can pump up the vibrancy and saturation at this stage.
Save the image at File - Save as and choose the format. You can save as png or jpeg. If I use layers while editing, I'll also save the psd file which is the Photoshop file format that preserves the layers, so I can open the image in Photoshop later and keep editing the different layers, if needed.
hi! I would like to know please if this tutorial applies to colour pencils art works too? Reply Delete


Would you like to paint on cardboard, but have noticed that the paint soaks into and you can't achieve bright colors? I'll show you how to prepare a piece of cardboard for painting with gesso primer. Cardboard works for both acrylic and oil painting and you might sometimes want to use it instead of canvas, board, wood or paper to save money or to be more environmentally friendly.

A quick tip on how to save acrylic paint for later! If you mix too much acrylic paint or pour too much paint out of the tube, do you know what to do with the leftover paint? If you're planning to continue painting the next day, you can't just leave it, cause acrylic paint will dry by then. You can watch the video on how to keep acrylic paint wet overnight and longer or keep reading. Mixed too much acrylic paint? You know how you sometimes mix too much acrylic paint or pour too much paint out of the tube? What do you do with the leftover paint? If you're planning to continue painting the next day, you can't just leave it, 'cause acrylic paint will dry by then. How to save leftover paint for reuse Here's one tip! Instead of pouring and mixing paint on a palette, use little containers you can close. The paint won't dry out when the lid is closed. That way you don't have to waste the leftover paint. And if you've mixed a good color and

Have you ever wondered if you can mix charcoal and acrylic paint by painting acrylic over charcoal or drawing charcoal over acrylic? I tried it and here are the results. Read on to find out how to combine charcoal and acrylics into a mixed media painting without smudging the charcoal lines and the paint colors.

Having trouble coming up with ideas for art projects, art blog posts or art YouTube channel videos? I've listed 100 (or 101) art video title or topic ideas for YouTube in this post. A lot of them work for blog posts, too. Some of them you can use as ideas for you art projects that you don't even post online. I divided the list into sections: general art video title ideas, art challenges, art tutorials, themed artworks and art series. Some art challenges have many versions of them (3 marker challenge, 2 marker challenge and 1 marker challenge or 10 minute and 30 minute drawing challenge), but I'll just name one of the versions. You can download the list PDF format to save it or print it out.

As I've mentioned before, I don't usually draw my sketches for paintings straight onto watercolor paper or canvas. I draw the sketch on a separate paper, where it's easier to erase and clean up the outlines and then transfer the finished sketch onto my painting surface. In this blog post I'll list five different methods to transfer your drawing onto the painting surface. They're all either cheap or completely free. Some require a computer or other technology and some don't. So hopefully, if you're struggling with how to transfer your sketches, one of these methods (or a combination of some of them) will suite your budget and the supplies you already have available. Lyhyesti suomeksi alla.